How to Identify Minerals: A Practical Guide for Collectors
Diving into mineral identification is like learning to read a secret language written in stone. To truly understand how to identify minerals, you have to look past obvious traits like color and start seeing their fundamental physical properties. It's all about training your eye and mastering a few key skills—that's how you begin to think like a real geologist.
Starting Your Mineral Identification Journey
The single biggest mistake most beginners make? Relying solely on color.
Sure, a brilliant purple amethyst is unmistakable, but color is often the most deceptive clue a mineral can offer. A few trace impurities can change everything. For instance, the mineral quartz is the foundation for purple amethyst, sunny yellow citrine, and soft rose quartz. Chemically, they're the same, but they look completely different.
A much more reliable path starts with a structured, methodical approach. You need to learn how to analyze a mineral's core characteristics, one by one.
For anyone just starting out, a basic mineral identification kit can be a surprisingly great entry point. These kits often come with the simple tools you'll need to get your hands dirty and start learning.
Assembling Your Essential Toolkit
You don't need a high-tech lab to get going. A simple, effective kit is all it takes, and you can put one together pretty easily.
A Hand Lens or Loupe: A good 10x magnification lens is your best friend. It lets you get up close and personal with tiny details like crystal faces and cleavage planes that are totally invisible to the naked eye.
A Streak Plate: This is just an unglazed porcelain tile, but it's an absolutely essential tool. When you rub a mineral across its surface, it leaves behind a powdered trail called a streak. That powder's color is far more consistent than the mineral's surface color. You can find quality specimens and tools in many specialized mineral shops.
This decision tree shows exactly why geologists quickly move beyond color and onto more dependable tests.
As you can see, the first question—"Is color reliable?"—points straight to "NO." It immediately guides you toward more definitive properties like luster, hardness, and cleavage.
The Art of Observation
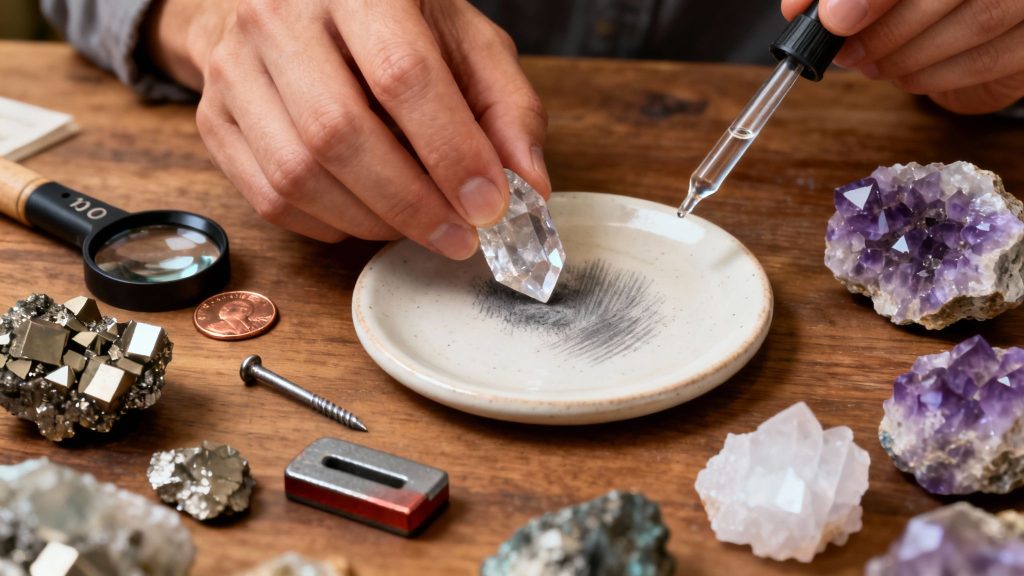
Before you start scratching or testing, just hold the specimen. Look at it. How does light play across its surface? This quality is called luster, and it's one of your first major clues.
Does it have a glassy (vitreous) shine like amethyst? A metallic gleam like pyrite? Or is it dull and earthy-looking?
By training your eye to catch these subtle details first, you're building a solid observational foundation. This simple practice of patient examination is the real starting point for accurately identifying any mineral you come across.
This initial, careful observation, combined with your basic toolkit, sets the stage for the more definitive tests to come. It helps you shift your focus from just what a mineral looks like to the scientific properties that truly define it.
Mastering the Mohs Hardness Test
Once you've taken a good look at a mineral's surface, it's time to get hands-on. The single most telling physical property you can test for is hardness—a mineral’s built-in resistance to being scratched. This is where the Mohs Hardness Scale becomes your best friend in the field.
The scale ranks ten common minerals on a simple 1 to 10 ladder, from Talc (the softest at 1) to Diamond (the hardest at 10). The principle is beautifully straightforward: a harder mineral will always scratch a softer one. Learning how to do this simple scratch test is a total game-changer, letting you rapidly narrow down what your specimen might be.
Performing a Scratch Test in the Field
You don't need a fancy lab kit to start testing. In fact, you probably have everything you need in your pocket or toolbox right now. The trick is to be systematic and to test on a small, inconspicuous part of your mineral to avoid leaving a big, ugly scratch on your new find.
Here are a few common tools that work great for this:
Your Fingernail: Clocks in at about a 2.5 on the scale. It's perfect for scratching super-soft minerals like gypsum or talc, but it won’t make a dent in something like calcite.
A Copper Penny: With a hardness of 3.5, a penny can easily scratch calcite but will be scratched by fluorite.
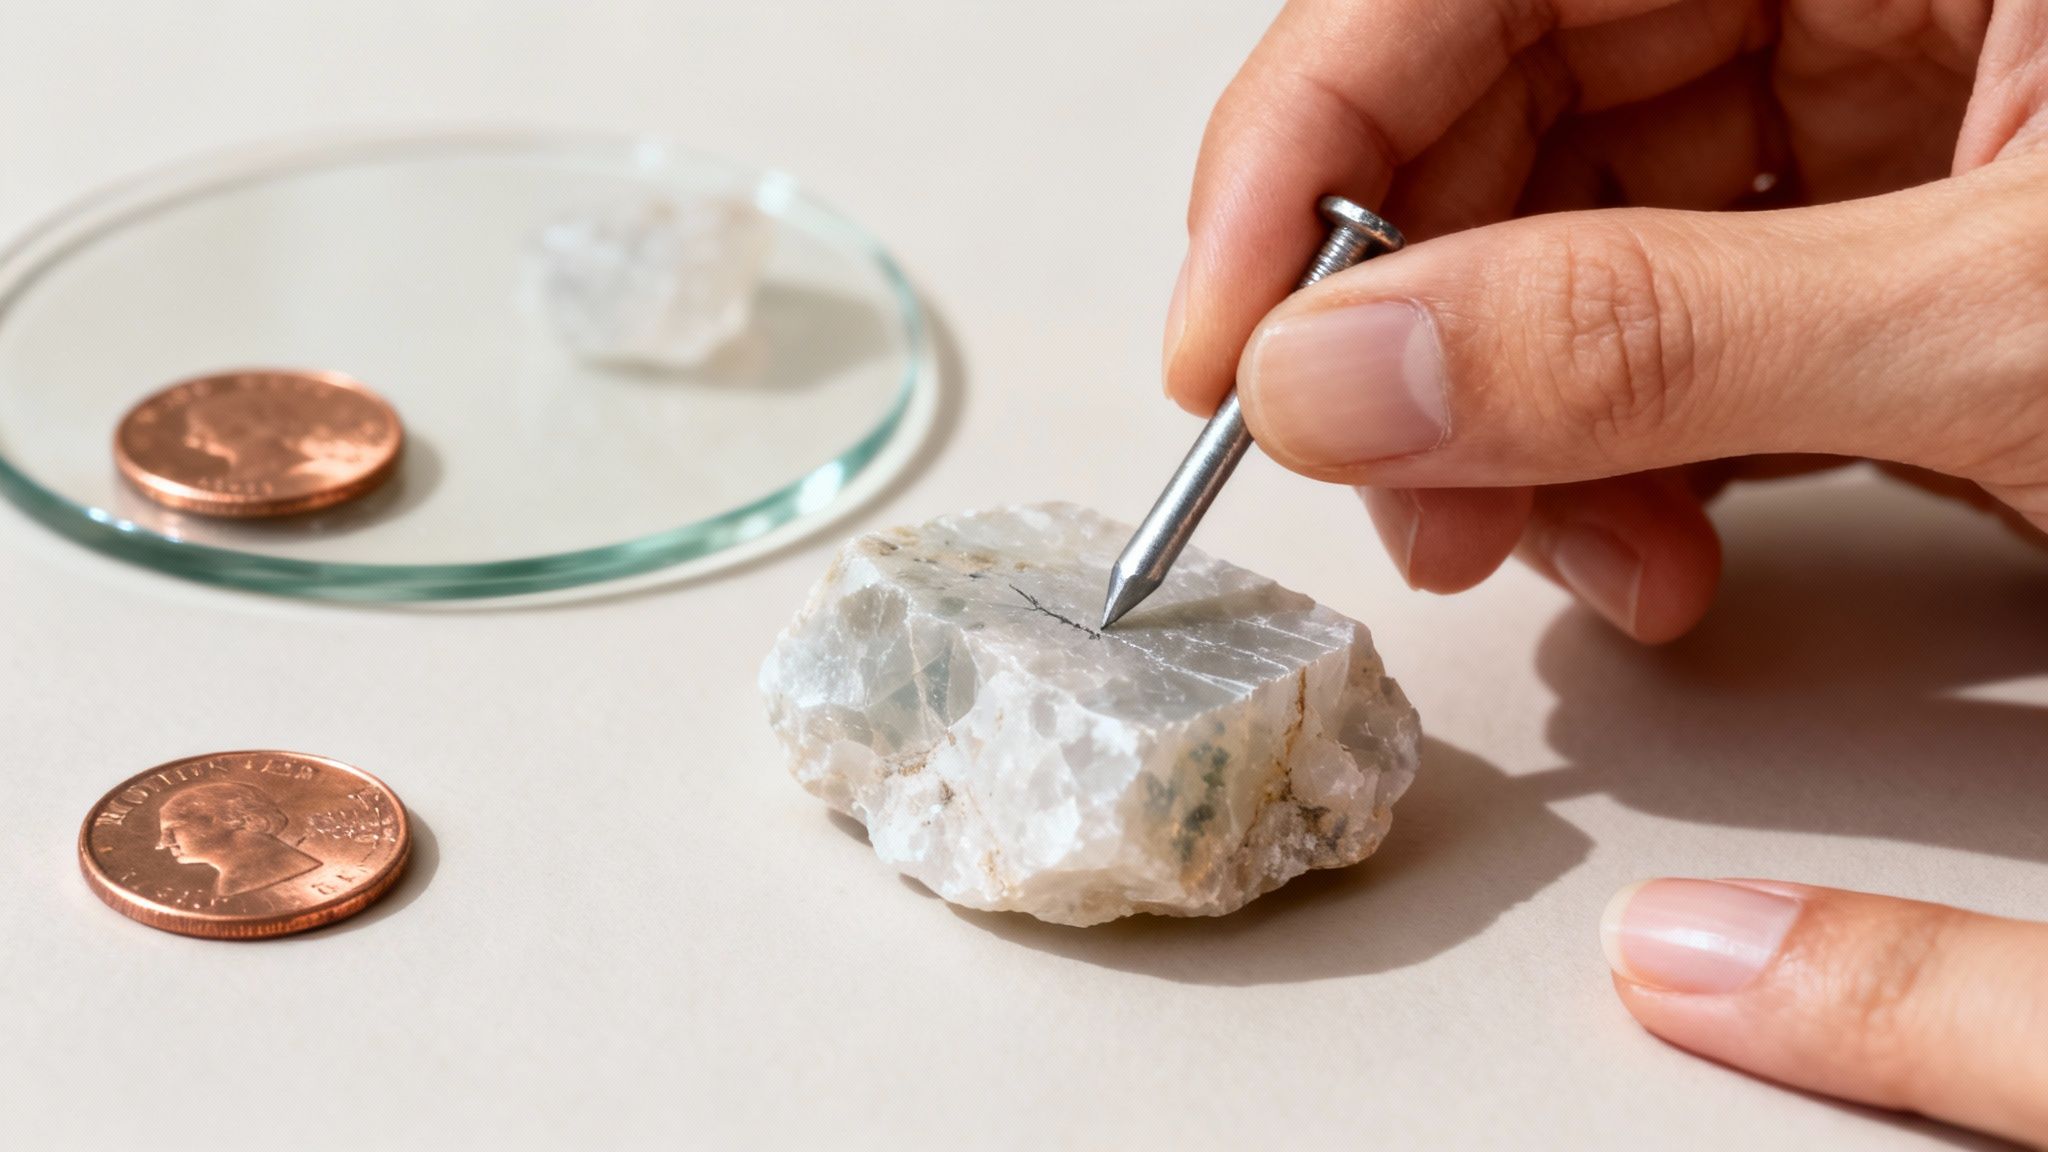
A Steel Nail or Knife Blade: These are typically around 5.5 in hardness. They're my go-to for telling apatite apart from tougher minerals like feldspar.
A Piece of Quartz: Sitting at a solid 7, quartz will scratch most common minerals without breaking a sweat. It won't, however, scratch topaz, corundum, or diamond. These beautiful Arkansas quartz clusters are a perfect example of this famously durable mineral.
The golden rule of the scratch test is simple: figure out which item scratches the other. If your steel nail scratches the mineral, the mineral is softer than 5.5. If your mineral scratches the nail, you know it's harder than 5.5. It's a process of elimination.
To make things even easier when you're out exploring, here's a quick reference table you can use.
Field Guide for Mohs Hardness Testing
Mohs Hardness
Index Mineral
Common Object for Testing
Can Be Scratched By
1
Talc
–
Your fingernail (2.5)
2
Gypsum
–
Your fingernail (2.5)
3
Calcite
Copper Penny (3.5)
A steel nail (5.5) or a knife blade
4
Fluorite
–
A steel nail (5.5) or a knife blade
5
Apatite
–
A steel nail (5.5) or a knife blade
6
Feldspar
Steel File (6.5)
Quartz (7)
7
Quartz
–
Topaz (8)
8
Topaz
–
Corundum (9)
9
Corundum
–
Diamond (10)
10
Diamond
–
Another diamond
Keep this chart handy, and you'll be surprised how quickly you start memorizing these key reference points.
Putting Hardness to the Test
This one test can solve some of the most common identification puzzles. Think you've found gold? Pyrite ("fool's gold") has a hardness of 6 to 6.5, which means it can easily scratch glass. Real gold is much softer, with a hardness of only 2.5 to 3—it would be easily scratched by a copper penny.
Another classic mix-up is telling calcite (hardness 3) and fluorite (hardness 4) apart. They can look almost identical, but a copper penny will leave a mark on calcite while leaving fluorite completely untouched. Mastering this test is a huge shortcut.
Honestly, this skill is fundamental. Hardness testing alone can help you correctly identify many common minerals. With many specimens being misidentified without it, the Mohs test is the essential first step for any serious collector. It helps you avoid common mistakes and identify your finds with real confidence.
Uncover a Mineral's True Colors with Streak and Luster
Once you've got a feel for a mineral's hardness, the next clues in your detective work are streak and luster. These two visual tests are incredibly powerful. While a mineral's surface color can be all over the place and frankly, quite misleading, its streak—the color of its powder—is one of the most consistent and revealing identifiers you can use. Geologists have relied on this trick for centuries.
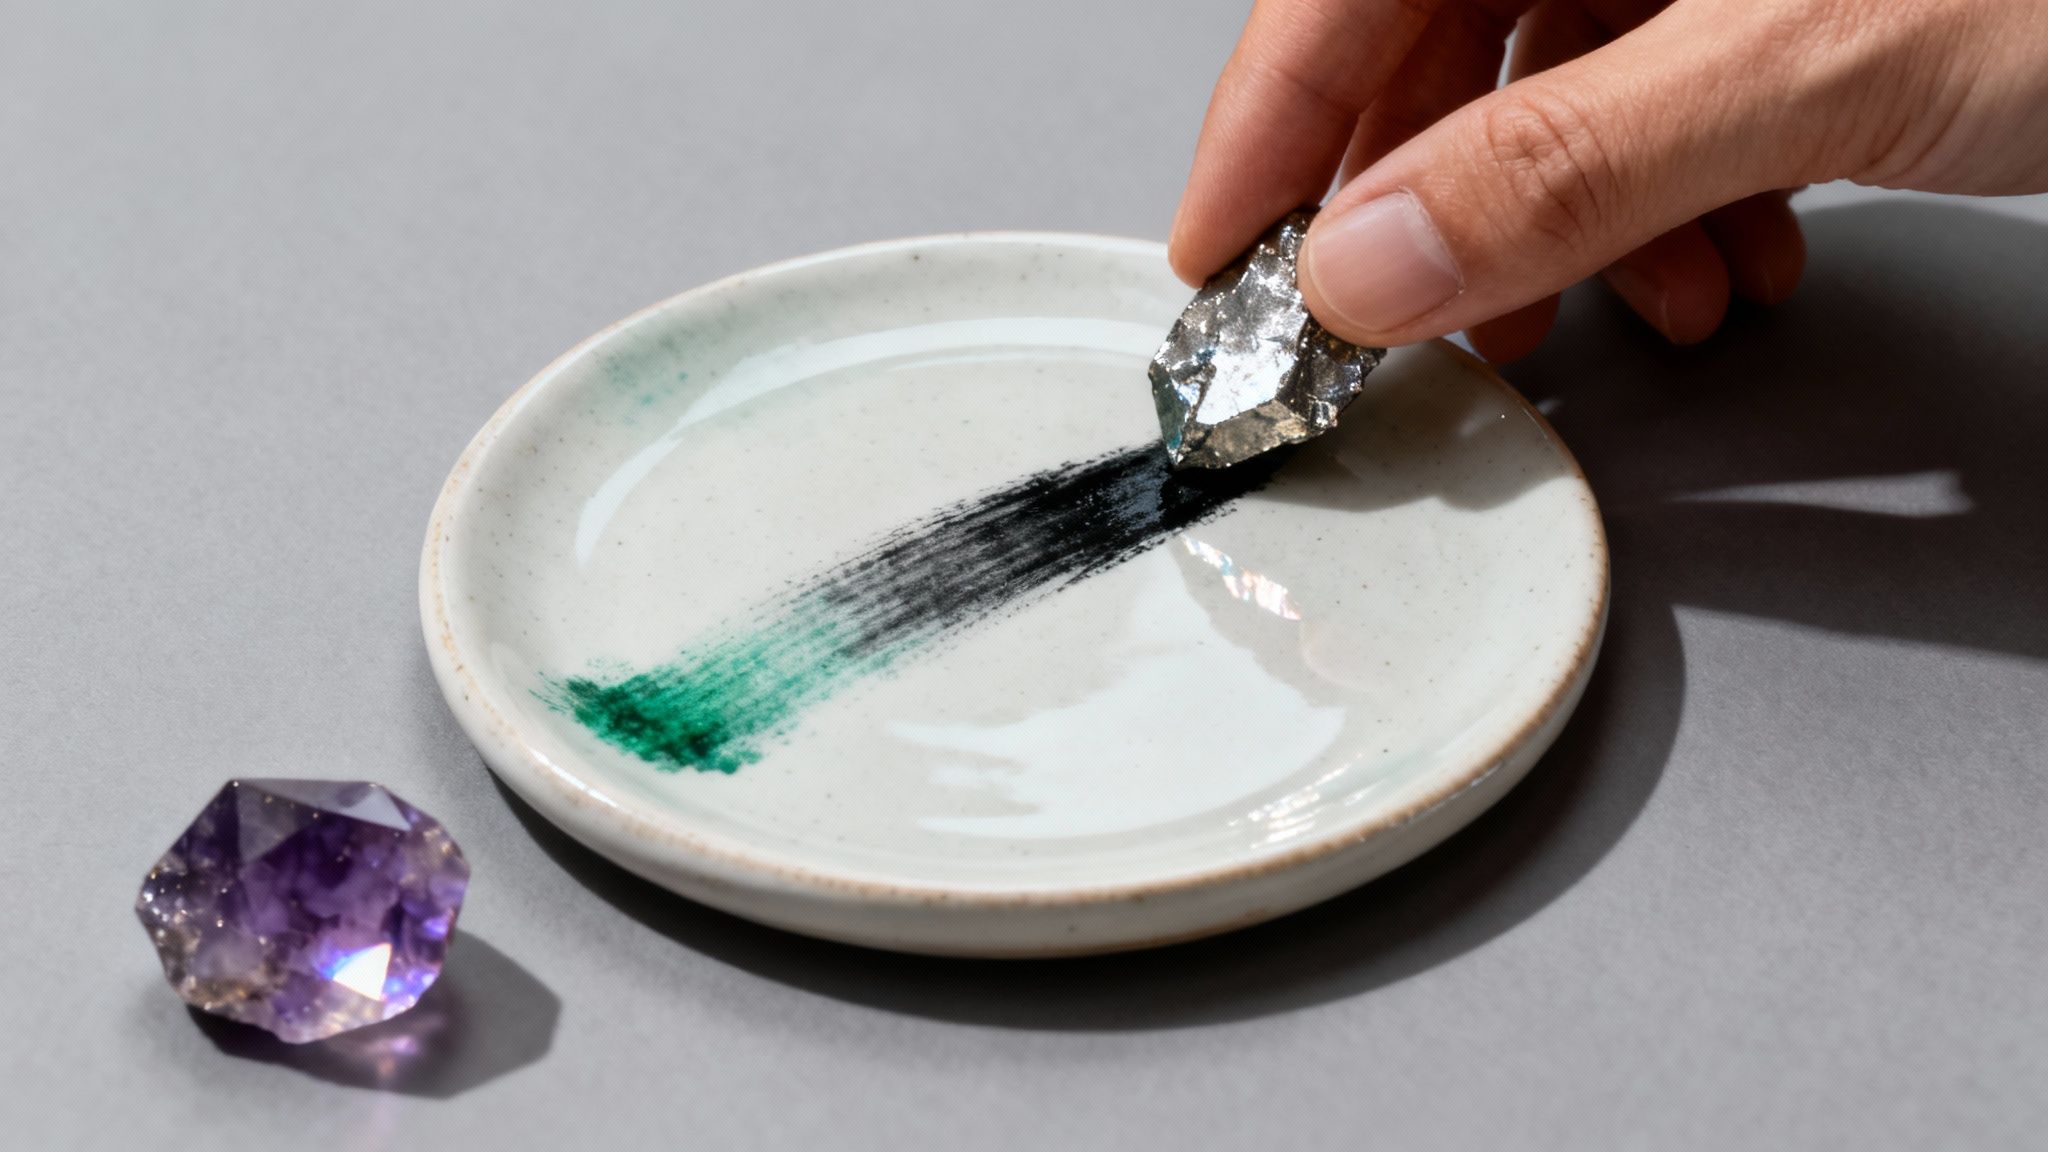
So, how do you do it? You'll need an unglazed porcelain tile, which is known as a streak plate. Just take your mineral and give it a good, firm scrape across the plate's surface. The colored powder left behind is the streak, and it tells a much more honest story than the specimen's outward appearance.
The classic example of this in action is telling apart pyrite ("fool's gold") from the real deal. Pyrite looks convincingly golden, but drag it across a streak plate and it leaves behind a distinct greenish-black powder. Real gold? It leaves a true, shimmering yellow-gold streak. Just like that, the mystery is solved.
Reading the Light: A Mineral's Luster
As you're performing the streak test, take a moment to notice how light plays off the surface of your mineral. This quality is called luster, and it’s another major piece of the identification puzzle. Think of it as the mineral's personality—is it flashy and bold, or subtle and soft?
Does your specimen shine like a freshly polished piece of metal? That's a metallic luster, a dead giveaway for minerals like galena and the aforementioned pyrite. Or maybe it has more of a glassy, transparent shine. That’s what geologists call vitreous luster, a signature look for many common favorites like amethyst, citrine, and rose quartz.
With a bit of practice, you'll start spotting other types of luster, too.
Pearly: Gives off a soft, iridescent glow, almost like the inside of an oyster shell. Talc is a great example.
Earthy: Looks dull and non-reflective, like a clump of dry soil. Think kaolinite.
Waxy: Has a sheen that reminds you of a candle's surface. You'll often see this in certain types of chalcedony.
Combining the streak color with your observation of its luster is a real one-two punch for identification. A greenish-black streak from a metallic-looking mineral screams pyrite. A reddish-brown streak from a similarly metallic specimen? That's a classic sign of hematite.
Even for beginners, these simple diagnostic tests are incredibly effective. The simple streak test can offer an immediate clue. While quartz leaves no colored streak at all, hematite famously smears a blood-red color—a method that field geologists still widely use today. You can see this mineral's beautiful effect in some varieties of hematite-coated quartz clusters.
Luster is just as vital. Simply recognizing whether a mineral is metallic like pyrite or vitreous like amethyst can help you confirm many potential identities right off the bat. These foundational tests are so reliable they often mimic the results of far more advanced equipment, giving you a solid basis for your conclusions.
Understanding How Minerals Break: Cleavage and Fracture
Beyond just scratching a mineral, the way it breaks apart when you hit it tells you a ton about its internal atomic structure. This is one of the more advanced tricks in learning how to identify minerals, but it's also one of the most definitive.
When you apply some force, a mineral will either cleave or fracture. Knowing which is which is a game-changer.
Cleavage is when a mineral breaks along perfectly flat, smooth planes. These are natural weak spots in its crystal structure. Think of it like a deck of cards—the atoms are stacked in perfect layers, and when you apply force, the mineral splits cleanly right along those layers.
This isn't just a random occurrence. It's dictated by the mineral’s crystal lattice. A classic example is mica, which you can literally peel apart into paper-thin, flexible sheets. That’s called "one direction of cleavage," and it's impossible to miss once you've seen it.
Spotting Cleavage Planes
Recognizing cleavage is all about looking for flat, reflective surfaces on a broken piece. My trick is to hold the sample up to a light and turn it slowly. If you see bright flashes of light bouncing off perfectly flat surfaces, you're looking at cleavage planes.
Some minerals show this off in multiple directions, creating some really cool and predictable geometric shapes.
Halite (Salt): This stuff breaks into perfect little cubes. That’s three directions of cleavage, all meeting at perfect 90-degree angles.
Calcite: Also has three directions of cleavage, but they aren't at 90-degree angles. This makes it break into rhombohedrons, which look like slanted boxes.
Fluorite: This one is really cool. It has four directions of cleavage, which causes it to break into octahedral shapes that look like two pyramids stuck together at the base.
Spotting these shapes is like finding a mineral's fingerprint. The number of cleavage planes and the angles between them are always the same for a specific mineral, making it an incredibly reliable ID tool.
Identifying Fracture Patterns
So what happens if a mineral doesn't have those neat, tidy planes of weakness? If its atomic bonds are just about equal in every direction, it won't cleave—it will fracture. Fracture is simply an irregular, random break that doesn’t follow any flat plane.
Instead of clean, shiny surfaces, you'll see rough, uneven, or even curved textures.
Quartz is probably the most famous example of a mineral that fractures. It has no cleavage at all. When it breaks, it displays a pattern called conchoidal fracture—a smooth, curved surface that looks just like the inside of a seashell or a piece of chipped glass. Obsidian, which is technically volcanic glass and not a mineral, also shows this pattern beautifully.
There are other types of fracture to look out for, too:
Fibrous: The mineral looks like it's breaking into splinters or fibers, like you'd see with asbestos.
Uneven: This is the most common type—just a rough, irregular surface with no real pattern to it.
Learning to tell a flat cleavage plane from a curved conchoidal fracture is a skill that really separates the beginners from the seasoned collectors. It’s what allows you to confidently tell a piece of quartz from calcite, for instance, even when they look almost identical at first glance.
Identifying Minerals by Their Crystal Shape
Once you've looked at how a mineral breaks, the next big clue is how it grows. A mineral's natural, undisturbed growth shape—what we call its crystal habit or form—is a direct reflection of its internal atomic structure. It’s like nature’s own geometry, creating stunningly precise shapes that are huge hints for anyone learning to identify minerals.
This field of study, crystallography, might sound intimidating, but you don't need a Ph.D. to start recognizing the most common shapes. When a mineral has enough room to grow without being crowded, it develops these signature forms, which can be remarkably consistent and beautiful.
Recognizing Common Crystal Systems
Learning to spot these fundamental shapes is a game-changer. You start to see the underlying order in the mineral kingdom, and you can quickly tell the difference between specimens that might otherwise look similar.
Here are a few of the most recognizable crystal systems you’ll run into:
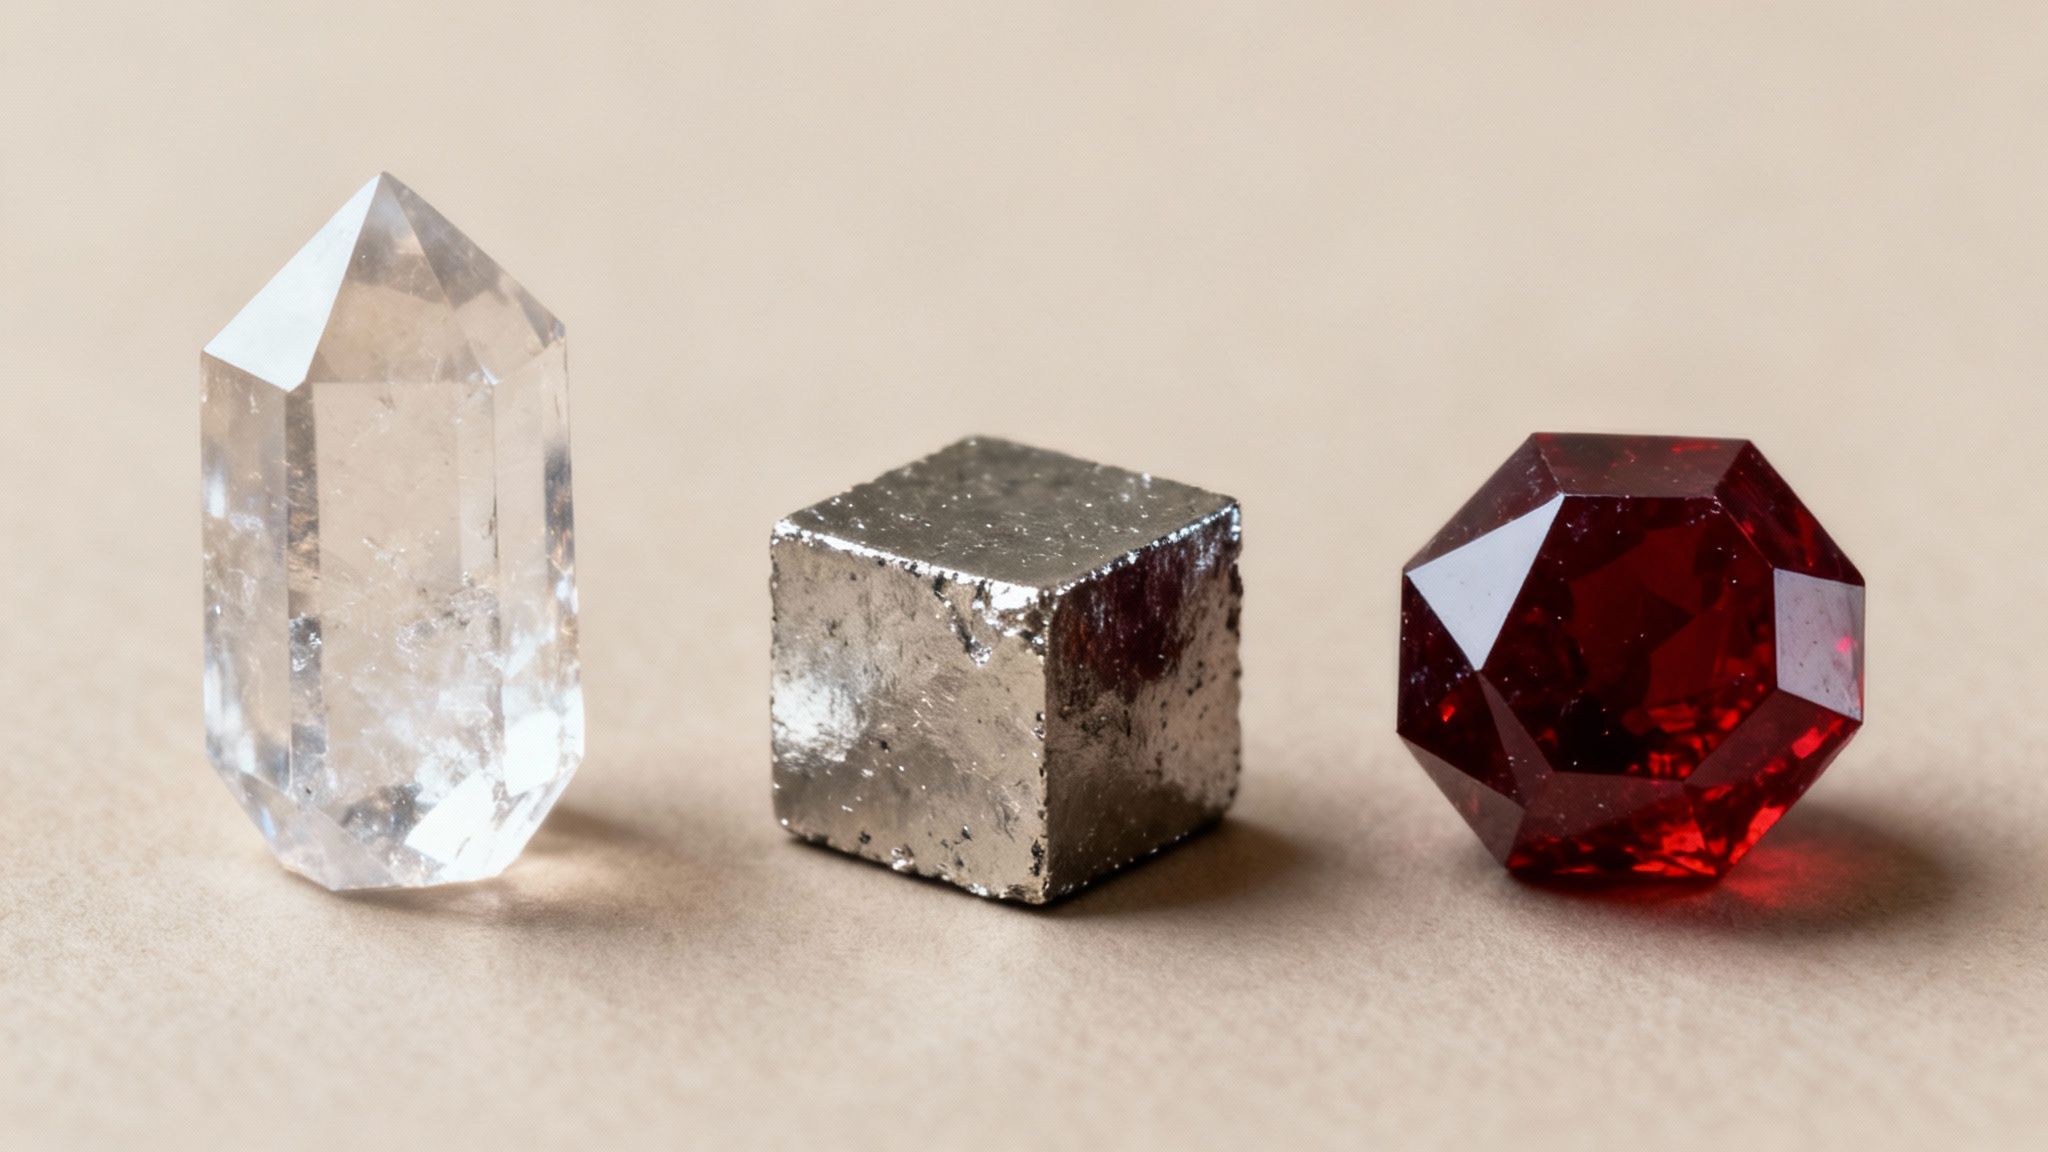
Cubic (Isometric) System: This system is all about perfect symmetry, producing cube-like shapes. The classic example is pyrite, which forms incredible, sharp metallic cubes. You can find some beautiful examples in these natural pyrite cubes. Garnet also belongs to this system, often forming twelve-sided dodecahedrons.
Hexagonal System: Minerals in this group often form six-sided prisms, sometimes topped with pyramid-like points. Quartz is the most famous member here, with varieties like amethyst and citrine showing off this elegant, elongated form.
Trigonal System: Closely related to the hexagonal system, this is where you'll find minerals like tourmaline and rose quartz. They're still based on a six-sided structure but have a slightly different internal symmetry.
A mineral's crystal shape is its architectural blueprint made visible. When you spot the six-sided prism of quartz or the perfect cube of pyrite, you're connecting the specimen's raw beauty directly to its scientific foundation.
Why Crystal Form Matters
This skill moves you beyond simple tests and into a deeper appreciation of a mineral’s identity. Being able to recognize these forms is incredibly valuable, both out in the field and for collectors who appreciate the natural artistry of well-formed specimens. It adds another powerful tool to your identification kit.
Understanding these crystal systems, a cornerstone of geology, can help you accurately identify many minerals. To learn more about the physics behind these mineral structures, you can explore recent energy research.
Common Questions About Identifying Minerals
Even with all the right tools and a systematic approach, some minerals can just leave you stumped. It happens to everyone. Let's walk through some of the most common questions and hurdles that come up when you're trying to nail down an identification.
Which Mineral Identification Test Is Most Important?
This is a great question, and while there's no single "magic bullet" test, the Mohs hardness test is probably the most powerful place to start, especially for beginners.
Why? Because it immediately eliminates huge categories of possibilities. If a simple steel knife easily scratches your specimen, you instantly know it can't be quartz, topaz, or corundum. Just like that, you've narrowed the field.
For a really effective one-two punch, follow up the hardness test with a streak test. This combination is often enough to get you incredibly close to the right answer before you even need to think about cleavage or crystal form.
How Do I Identify a Mineral with Multiple Colors?
Ah, the color conundrum. This trips up so many people because a mineral's surface color is one of the least reliable properties for identification. It’s often contaminated by trace elements and impurities.
Think about quartz. It can show up as purple amethyst, yellow citrine, or pink rose quartz. They all look completely different, but they're fundamentally the same mineral. This is precisely why the streak test is your best friend.
The streak reveals the mineral's true, powdered color, which is far more consistent. Always trust the streak over the external body color—it cuts right through the confusion.
What Should I Do When the Basic Tests Are Not Enough?
So you've run through hardness, streak, luster, and cleavage, but you're still stuck between a few possibilities. Now it's time to bring in the secondary tests. These can often provide that final, definitive clue.
Specific Gravity: This is basically a measure of density. It might sound technical, but you can often get a good sense of it just by feel. A mineral that feels surprisingly heavy for its size—like galena or barite—is a major clue.
Magnetism: This one's easy. A small magnet will tell you instantly if you're dealing with something like magnetite, which is strongly magnetic.
Acid Reaction: A single drop of dilute acid will cause carbonate minerals like calcite to fizz. It's an unmistakable reaction that confirms an identification on the spot.
When your initial toolkit has taken you as far as it can, turning to these secondary properties is the next logical step. If you're still scratching your head, don't be afraid to seek expert guidance. Fantastic online resources like Mindat.org exist, and local geology clubs are often filled with passionate experts who are happy to help.
What Tools Do I Need in a Beginner's Identification Kit?
You don't need a professional lab to start identifying minerals. A powerful starter kit is simple, inexpensive, and gives you everything you need to perform the key tests we've discussed.
Here are the absolute essentials for a field kit:
A 10x jeweler's loupe or hand lens for getting a closer look.
An unglazed porcelain tile for performing streak tests.
A basic hardness testing kit: your fingernail (hardness 2.5), a copper penny (3.5), and a steel nail (~5.5).
A small, strong magnet.
A good mineral field guide that's specific to your region.
With just these few items in your bag, you'll be well-prepared to uncover the identity of almost any mineral you come across.
At Astro West, we believe every stone has a story to tell. For over 60 years, our family has shared a passion for fine minerals, fossils, and meteorites with collectors and enthusiasts. Whether you're just starting your journey or seeking a museum-quality centerpiece, we invite you to explore our curated collection of natural treasures. Discover your next find at https://astrowest.com.